How to Set Jointer Knives
A well-tuned jointer helps prepare flat reference faces on turning blanks — essential when you need a clean mounting surface for a faceplate or want to true up stock before chucking. A jointer can perform only as well as the condition of its knives. Even properly sharpened knives won't cut wood cleanly and consistently unless they are set correctly in the machine.
The most frustrating aspect of setting a jointer knife is that it will raise slightly as the lock-shim is tightened. To help set the height, I've tried straightedges (see the photo below) and magnetic knife-setting fixtures but with little success. This is because the geometry of the knife-holding assembly dictates that the set screws, when snugged, will raise the knife in the cutterhead. But by using a dial indicator, I can see how much the knife raises when tightened to anticipate this movement. I then reset the height to compensate for the effect. The principles I use to set jointer knives apply to all jointers, though not to most jointer-planers. Using an 8-inch-wide jointer as a reference, I'll explain how I set knives in the machines I frequently repair for high schools and production shops. But first, I'll talk about sharpening and balancing the knives.
Getting Sharp and Balanced Knives
I have had only marginal success when I tried honing jointer knives myself. Woodworkers who want to extend the use of installed knives will hone a secondary bevel on them while they're still in the machine. While the procedure works fine for limited operations, such as surfacing figured stock, it won't work if the knives have been worn too much. So for the time and hassle it saves, I prefer regular knife grinding by an experienced sharpener. Professional shops charge about 35 cents per inch of blade to put on a straight, hair-shaving edge. The knives should come back from the sharpener equal in size and weight. If they're not, you risk causing an out-of-balance cutterhead. To avoid this, I always weigh the knives on a sensitive scale before I install them. If needed, I grind a small amount of steel from the ends or from the backs of the knives until I have a balanced set.
It's a good idea to keep a spare set of honed and balanced knives to use while you're waiting for the original set to be sharpened. Order the knives directly from the machine's manufacturer because aftermarket knives are frequently slightly bigger or smaller than the factory knives. Occasionally, new knives produce streaks on the stock. Don't worry. This is normal and should disappear shortly. If your razor-sharp knives have a wire edge, carefully remove it with a stone. While you're at it, you can bevel the ends of the knives, so you'll get smoother rabbet cuts with your jointer.
Determining outfeed height and safe knife size
I always set the tip of the knives at the exact height and parallel to the top of the outfeed table. Check your jointer's manual to see how far above the head the knives should protrude. Generally, the heel of the knife bevel should be about 1/16 inch above the cutterhead. If the heel is below the cutterhead, you are inviting chips to get compacted there. The knife tip should also extend 1/16 inch or so above the lock-shim chipbreaker. Set the outfeed table to allow for these measurements. For jointers without adjustable outfeed tables, you may want to set the knives .002 inch proud of the table to allow for the quick edge wear that commonly occurs after sharpening. If your cutterhead has jackscrews, be sure that the knife lifters don't stick above the arc of the knives.
What if you suspect your knives are too narrow? A good rule of thumb is the bottom of the knife, when properly placed against the lock-shim, should not be visible through the setscrew holes. Reject the knife if you see the bottom edge (or if you don't see any knife at all). You want the holes to be filled with the knife so that they get full pressure from the screws. Also, to avoid distorting the cutterhead, you want to remove and reset only one knife at a time. It doesn't take a lot of torque to snug the lock-shims. To get a feel for this, loosen a couple of the correctly installed lock-shim setscrews; then retighten them to their same positions while you note how much pressure it takes to return it to the original spot.
Preparation
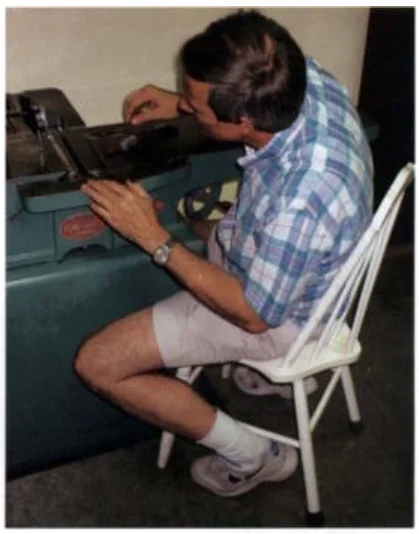
Before you install the knives, pull the jointer's plug and place it in clear view. Next, remove the fence and guard, then pull off the dust-collector boot. Then clean up the work area to keep dust out of the cutterhead and to make dropped parts easier to find. Get a stool so you'll save your back (see the photo above), and plan to replace the knives in one session. Number each knife slot on the cutterhead with a felt-tip marker so that you will have a reference later. Check the cutterhead for any play. It should be tight from side to side but revolve freely. Also, check to see that the pulley is snug. If you have an adjustable outfeed table, lock it securely in its ways.
About the dial indicator
A dial indicator is the best instrument I've used to set jointer knives. Though not as durable as the machinist-grade indicator I use in the field, the cheaper model serves well in a woodshop. I hacksawed off the reduced-diameter end of my indicator's arm so I could rotate the dial to face me. To go with the indicator, I recommend you buy a 1/8-inch-wide convex replacement tip. The tips, which are sold by machine-shop suppliers for about $3.50, spread out the contact area on a sharp knife edge.
Other tools you will need
The next important item for the job is a thin wrench to slip in the knife slots and to snug the lock-shim screws. I ground my own wrench from an old planer blade. It's also helpful to use a wrench extension (I use a piece of copper pipe) to keep your knuckles out of knife-slicing territory.
About 40% of the jointers I service have knife lifters and jackscrews that raise and lower with an Allen wrench (see the photo on the facing page). For the rest of the jointers, I stick an ice pick between the bottom of the knife and its slot and pry the knife up. When prying up a knife, make sure the set screws are only tight enough to keep the knife from falling out as the cutterhead is rotated. To knock a knife down, I use a wooden block. If a little more force is needed, I tap the block with a plastic-headed mallet.
To clean sawdust out of the knife slots, I use an old toothbrush (see the photo above). I use a piece of emery cloth and a little mineral spirits to loosen pine pitch and light rust. It is also handy to have a strip of fine sandpaper to remove any burrs from the lock-shim.
Calibrating the indicator
Set the indicator's magnetic base on the outfeed table, but leave the magnet off so you can slide the base. Locate the arm so the plunger tip brushes the top of the cutterhead. Set the fine-adjustment knob so the dial's hand moves a few thousandths as you move the base back and forth perpendicular to the head. When the plunger is over the cutterhead's top dead center (TDC), the gauge will be at its maximum reading. Carefully move the arm so the tip touches the outfeed table. Zero the gauge by turning the dial. Your datum is now at the plane of the top of the outfeed table. While you're setting knives, you should periodically recalibrate the instrument in case you lose zero.

Setting the Knives
After I remove one of the old knives, I loosely install a sharp knife in the cutterhead approximately in its proper position. In a nutshell, here's how I use the dial indicator:
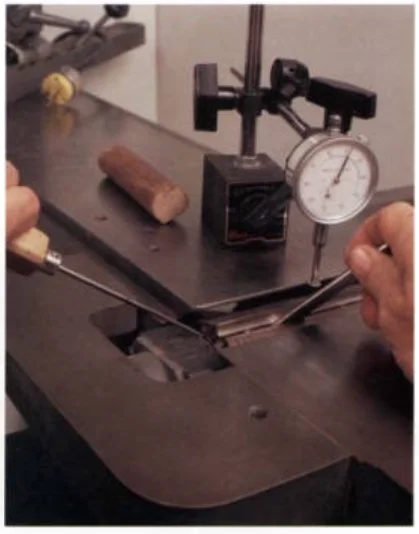
- With the indicator calibrated, I slide its base on the outfeed table to the far (fence) end of the cutterhead.
- I swing the indicator's plunger over the cutterhead and find its TDC by moving the base forward and backward.
- I hold the base position with one hand once I've found TDC.
- I rotate the cutterhead backward until the knife edge is under the tip (see the photo at left above) and then adjust the knife height, so the dial shows it is about 0.002 inch below the outfeed table. While snugging the screw, I check that the tip of the knife raises to the intended height (the reading should approach zero). Then I repeat this at the other (rabbeting) end of the cutterhead.
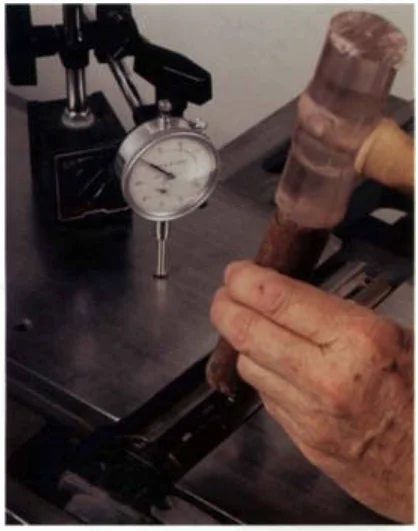
- Working my way down the knife, I adjust its height (by prying or tapping down) over each lock-shim setscrew so when the screw is tightened, the knife edge is even with the outfeed table. By rocking the cutterhead back and forth, I make sure I'm reading TDC.
- I go back and evenly torque all the setscrews. It is important to get uniform pressure (and stresses) throughout the head, so I use the wrench extension, which gives me a better feel for this.
- I rotate the cutterhead and remove the next knife. I roughly position another sharp knife and repeat the above sequence.
- With all the knives in place, I double-check that their edges are level with the outfeed table. I then use the indicator to set the infeed table at the height of the outfeed table. If necessary, I readjust the pointer of the depth-of-cut gauge to read zero.
For an average 6-inch or 8-inch jointer, it takes about 1.5 hours to set knives with an indicator the first time. After that, you'll be doing it in 45 minutes. Although the job is tedious and exacting, you'll soon be hearing the sizzle of sharpness and precision, instead of the drumming of a single knife against your stock.
Correcting Crooked and Nicked Knives
Occasionally, a knife will be ground with a slight bow in it—usually low in the middle. You can correct the concave shape by deflecting the knife into position. You'll actually be snaking it (we're talking a few thousandths of an inch here) up or down at the screws. To do this, zero and lock the knife in the middle of the head. With the setscrew on one end snugged just slightly, tap down and tighten the lock-shim as you move along the knife. Go to the other end, and repeat the procedure. Similarly, you can correct a convex knife by snugging the ends and then knocking down the knife's middle section.
If you hit a nail with a fresh set of knives, no big deal. All you have to do is reset two of the nicked knives. Just slide and lock one to the left and the other to the right to erase the nick.

This guide comes to us courtesy of Bob Vaughn.
Written by Vince
Vince is a woodturner and the founder of WoodturningOnline. He writes tool reviews, buying guides, and turning tutorials to help woodturners at every level make informed decisions about their craft and equipment.