How to Spray Lacquer: Illustrated Guide
As an Amazon Associate this site earns from qualifying purchases. If you buy through a link in this article, a small commission comes back at no extra cost to you.
Spraying lacquer comes down to four numbers: thin the lacquer 10-20%, set the regulator to 20-25 PSI under load, spray from 10-12 inches, and recoat every 15 minutes. This guide walks through the full system — compressor, gun, mixing, technique — for bowls, pens, and furniture alike.
About this guide — Everything here applies to any sprayed wood finish, but the numbers (PSI, thinning ratios, recoat windows) are for solvent lacquer, which stays the fastest film finish you can put on a turned piece.
What is spray lacquer?
Spray lacquer is a solvent-based film finish — usually nitrocellulose or a catalyzed variant — that is atomized into a fine mist by compressed air and built up in thin coats. Each coat partially dissolves the one beneath it, so the film cures as a single layer rather than a stack. That self-melting behavior is what makes lacquer forgiving to repair and fast to build: a small piece can carry four coats in an hour.
The standard was set decades ago. Fine Woodworking put it plainly back in 1981: a good lacquer finish "has the quality of a mirror" — and if the surface underneath is badly prepared, it will unforgivingly reveal every irregularity ("Lacquer Finishing," FWW, Nov/Dec 1981). Gregory Johnson, writing in FWW's Jan/Feb 1987 issue, called sprayed lacquer harder to apply than oil or brushed varnish but "among the most workable, practical finishes for the small shop" — which is still the honest trade-off today.
Why Spray Lacquer?
There are a dozen ways to finish your turned projects, so why should you pick spray lacquering?
One big plus to a spray lacquer finish is the professional appearance it gives to any piece. Most items of furniture you find in the store have been finished in this way. It provides more of a visible coating than an oil finish, but it protects far better — a proper lacquer film shrugs off water rings and handling that would mark an oiled surface within weeks. That makes it the right finish for hard-wearing projects such as dining tables, and unlike paint, you still get to see the grain.
A popular way to finish projects is polyurethane, but brushing poly means waiting 4-6 hours between coats and sanding each one — a three-coat finish stretches across two or three days. When spraying lacquer on smaller projects you can lay four coats in a single hour, excluding cure time, and no sanding is needed between coats.
Lacquer can also be applied with a brush, but the result is nowhere near as even as spraying. Lacquer is 'self-wetting': every new coat melds with the previous one. That makes mistakes easy to fix, but it also means brush strokes disturb everything applied so far, creating dents and streaks.
Can’t I just use aerosol cans?
The easiest method of spray lacquering is using pre-mixed and packaged aerosol cans also known as ‘rattle cans’. While these are great for getting a feel for using lacquer and don’t require any set up they definitely produce an inferior result when compared to a proper spraying system. This is usually because the lacquer itself is of a lower quality and of course, you have much less control when applying. While this method may allow you to skip the setup costs, the cost of the lacquer is 3-4x greater when buying aerosol cans, usually for a lower-quality product.
If you’ve been using rattle cans for a while and want a more cost-effective system definitely consider investing in a proper system. The results really are far superior and once you are set up it is faster, cheaper per coat, and far more controllable.
What you need
So you want to start spray lacquering? Well, the first step is to get your system properly assembled. There are a few essential pieces that you will need to purchase to get up and running. The set-up doesn’t have to be expensive, with basic kits coming in at under $200 and containing everything you need.
The setup is fairly simple and is essentially just a spray gun and air compressor system. There are also a few additional components that will ensure a professional finish every time.
Air Compressor
The air compressor is essential as this is what causes the lacquer to atomize and turn into a fine mist which creates beautiful smooth thin layers when spraying. When connected to a power source, air compressors create pressurized air which is kept in a storage tank and can be used to power nailers, sanders, and spray guns alike. It is important to select a compressor that can provide the correct pressure and airflow volume.
CFM
Only relatively low pressure is needed for lacquer sprayers so your main focus should be the airflow. This doesn’t mean you need to go for a huge compressor, you just want to make sure that it produces at least 1.5 x the CFM that your spray gun needs. CFM stands for cubic feet per minute and is a standard measure of the amount of air your compressor produces per minute. You need to select an air compressor with a CFM that is higher than the requirements of your spray gun. If you go for a compressor with a CFM equal to or lower than the requirements you will get an imperfect coverage.
Choosing the right compressor
The size of the pieces that you hope to spray will also make a difference. The tank size will affect the length of time you can spray for before the tank needs to refill. The tank refilling can affect the air pressure so if you will be spraying large pieces you may want to consider purchasing a larger compressor to ensure consistency.
Other things to consider are how noisy the compressor is and how much space it will use up in your workshop.
Two proven options:
The California Air Tools 10020C is a great compressor for a HVLP system however it is a bit on the pricey side. California Air Tools is a reliable brand that comes out on top again and again so a good choice if you are looking to invest in a reliable and versatile compressor.
The Bostitch-BTFP020 is great for a budget option but has a fairly low CFM so make sure to check the requirements of the tools you hope to use before purchasing.
Regulator
An air regulator gives you much more control over the air pressure and airflow which helps to ensure even coverage when spraying. Most guns come with an air regulator knob but if you want to achieve professional results an in-line regulator is crucial. Something to bear in mind is that any pieces with plastic components may end up being damaged by lacquer thinners when cleaning. So look for sturdy components made out of quality materials.
Hose
The hose should be at least 15-25 ft and have a suitable inside diameter (ID) for your spray gun. Look for a hose with an ID of more than a ¼ inch if you are setting up a HVLP system. If the ID is too small then it will lower the air pressure.
Inline Moisture collector
This component is important to stop water bleeding with the lacquer and affecting the application.
Spray Gun
Reasonably priced spray guns are everywhere. You don’t need anything fancy, just make sure that your air compressor is compatible with the tool that you choose. A Low Volume Low Pressure (LVLP) gravity spray gun is my gun of choice as it creates less overspray but does not require a high CFM rating. This means that less product is wasted which is better for your wallet and for the environment. Also, you can get away with a smaller compressor. A High Volume Low Pressure HVLP sprayer gun is a good option if you have an air compressor with a higher CFM. Both LVLP and HVLP both produce less overspray than a traditional gun. Overspray can drift back onto your project and create a white powdery film so greater efficiency also leads to a better-looking finish.
There is no specific type of sprayer for lacquer. A spray paint gun will also be suitable for lacquer and vice versa.
Solid spray guns sit on the shelf of any hardware store.
Two budget-friendly options available on Amazon:
How to set-up
Now that you have all the necessary components, you are ready to start setting up your spraying system. You will also need to make sure you have the appropriate connectors and a roll of Teflon/plumber's tape.
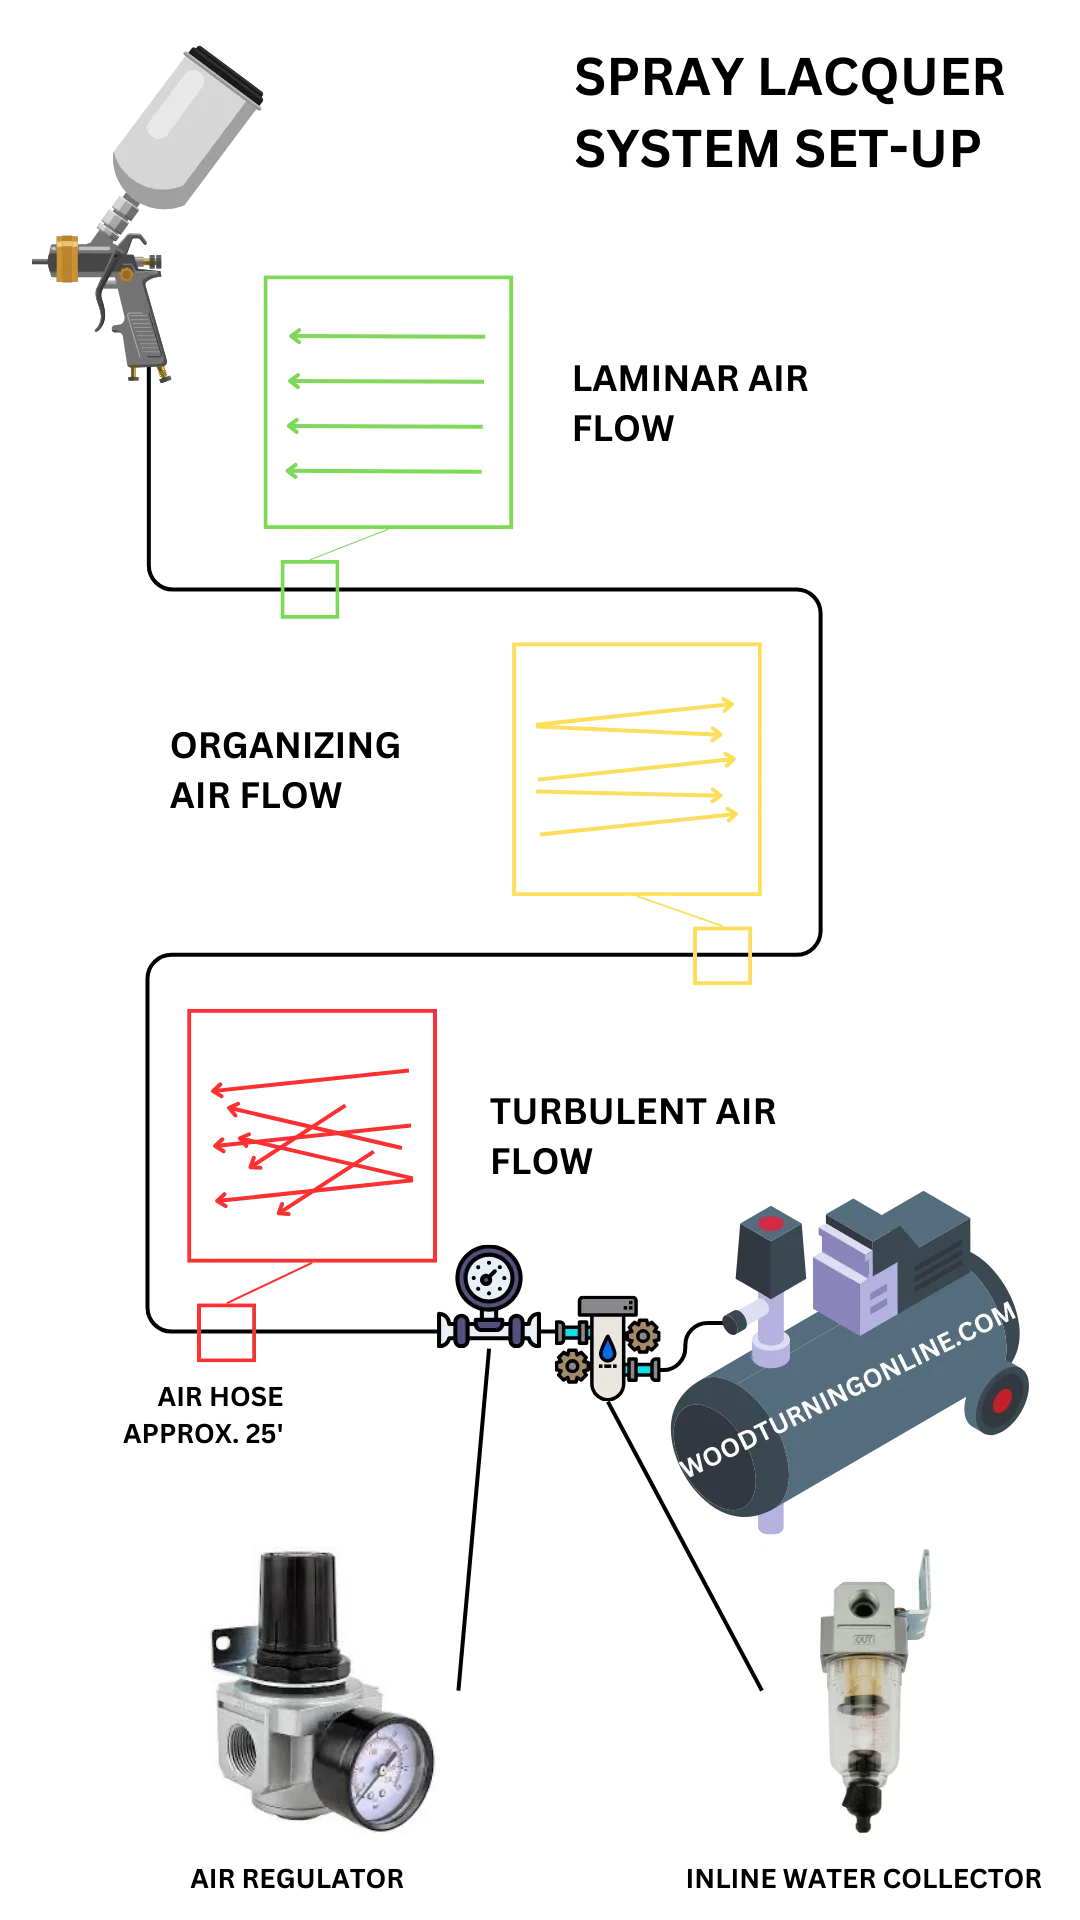
Order of attachment
The order of attachment is important to get the best results. The air becomes turbulent when pushed through components such as the compressor and regulator so you should always fit the regulator at the compressor end of the hose and not next to the gun. The long hose means that air turbulence has decreased by the time it reaches your gun, allowing for smooth airflow. The order of attachment should be:
Air Compressor - Water Collector - Regulator - Hose
Fasten all the pieces on nice and tight so that there is no air leakage.
Connectors
All your components need to be fitted together with the appropriate connectors. You may be tempted by quick disconnect fittings as they are easy to attach and remove without the use of tools. While these can be handy they can affect the air pressure. Unless you plan to regularly remove and change the components, regular fittings will suffice. It’s easy enough to use tools to tighten and loosen the fittings at the beginning and end of a lacquering session. If you do decide to go with quick disconnect fittings opt for the ’high-flow’ options to reduce pressure loss. Apply Teflon tape to the threads before adding your connector fittings to minimize air leakage. Wrap the tape in the same direction that the fitting will be tightened so that it won't unravel when you screw on the connector.
Using a spray gun
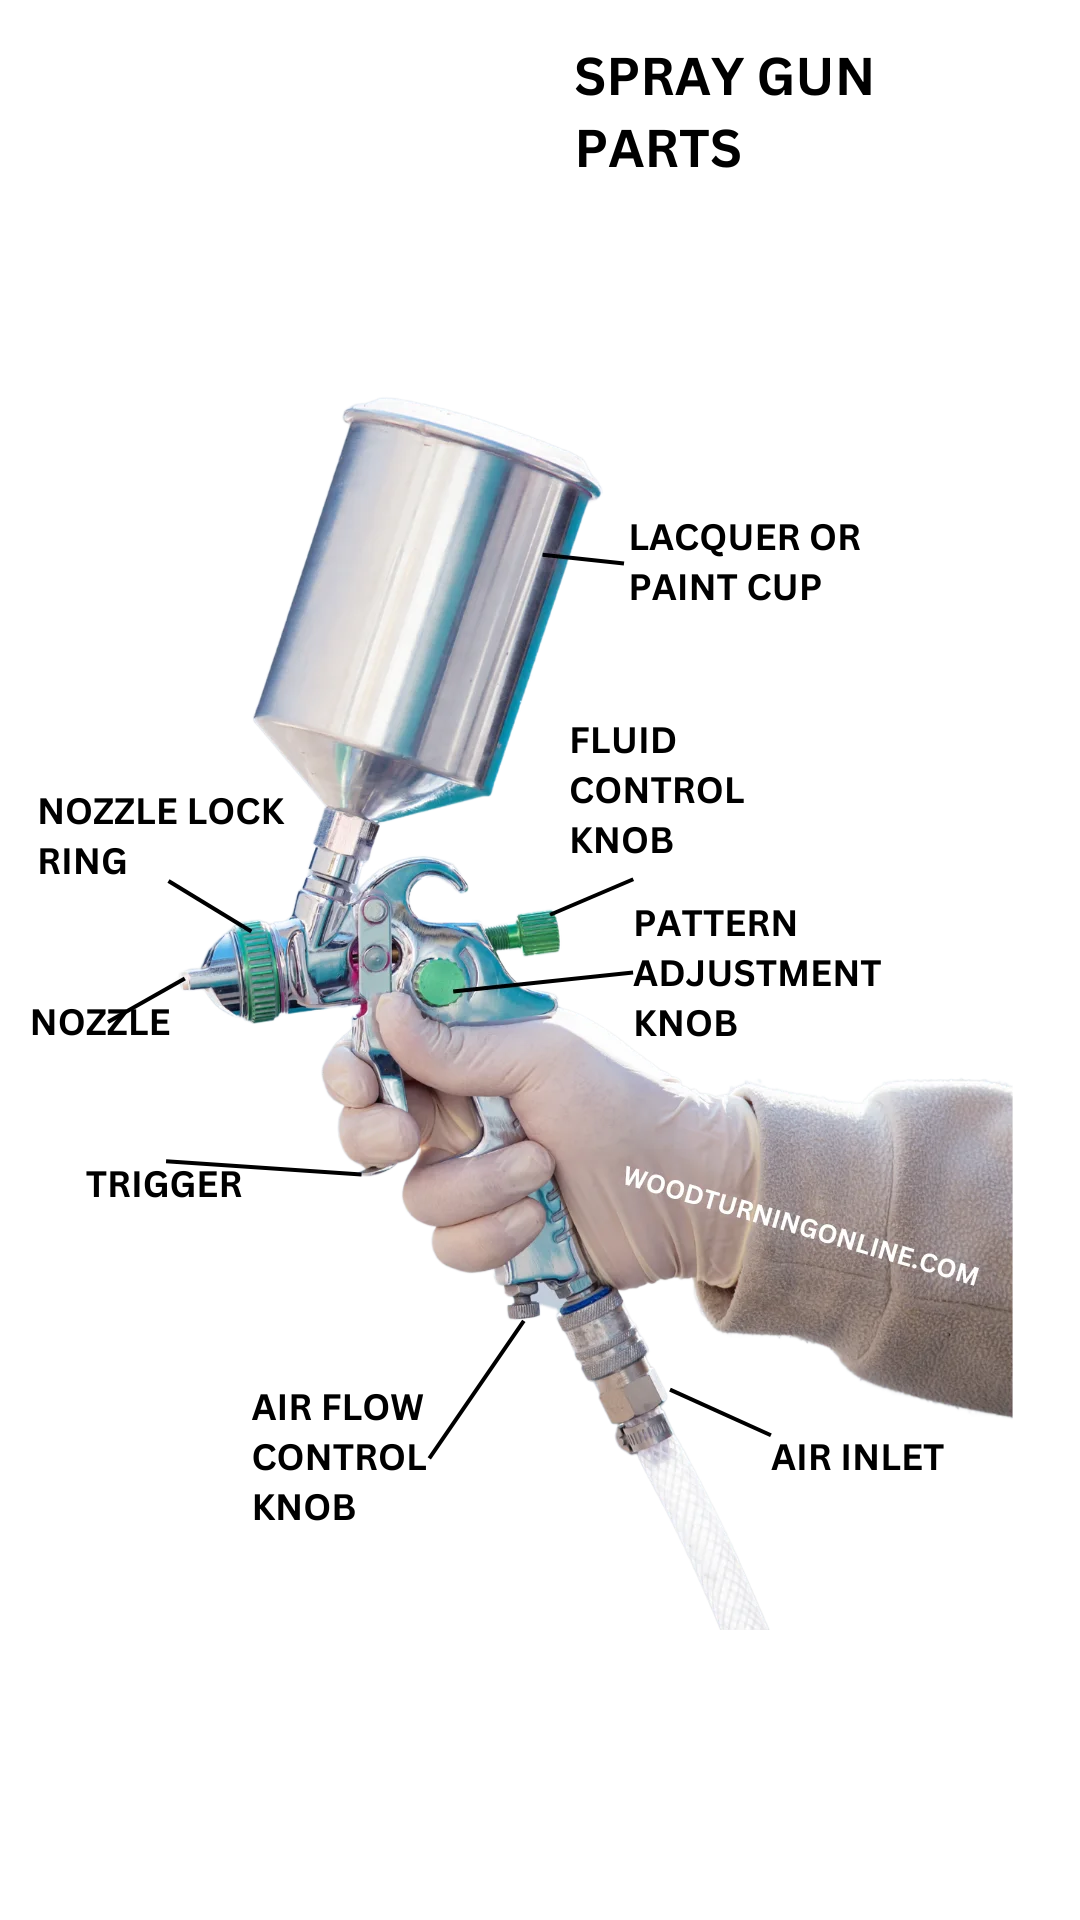
A spray gun is simpler than it looks. A spray gun has 2 passages. One for air and one for fluid, in this case lacquer. When air and fluid push through the gun, the lacquer atomizes and becomes a fine mist. You will notice 3 knobs on the gun. These control fluid flow, air flow, and pattern. Open the airflow knob all the way and leave it alone. You will be controlling air flow using the regulator.
Pulling the trigger moves the gun's needle back. The needle releases air first and then fluid. You can draw the needle back slowly by gently pulling the trigger, allowing you to control the amount of fluid and also test the airflow without wasting any lacquer.
You can remove the needle for cleaning and to adjust. Adjusting the prongs also gives you control of the spray pattern. When the prongs are horizontal you will get a vertical spray pattern. If the prongs are vertical you will get a horizontal spray pattern.
The gun also has a cup for the lacquer. This may be a gravity cup that sits above the gun and uses gravity to feed paint into the gun. Alternatively, it could be a siphon cup that uses air pressure to suck the lacquer up into the gun. I would recommend the gravity cup option as it creates less waste.
The numbers that matter — 20-25 PSI at the gun while spraying (set 30-35 static). 10-20% thinner. 10-12 inches from the work. 50% pass overlap. 15 minutes between coats, 30+ minutes before sanding, 24 hours to cure. Everything else is technique.
Air regulator and pressure
The in-line regulator controls the pressure. You will be able to see the pressure on the gauge. This should be between 20-25 pounds per square inch (PSI). Start by setting this higher at around 30-35 PSI as it will drop while spraying. Press the trigger fully and check the pressure on the gauge while spraying to see that it fits within the correct range.
Too little pressure will cause spitting and dribbling while too much will create a mist that is too fine and unusable. If the mist is too fine then the lacquer spray can dry in the air before it reaches your project and will settle on the surface as a layer of white powdery dust.
Test run

Always do a test run to make sure you have completed the set-up correctly and to avoid wasting product.
First, you want to check the fluid flow. Perform this test with just your lacquer thinner and without the lacquer spray gun attached to the hose. First remove the nozzle tip then place a bowl or cup underneath to catch the product. When you press the trigger you should see a clear arching flow of liquid.
The next step is to add air. Securely attach the hose and switch on your compressor, allowing air to build up. Once air has built up you can test application on a scrap piece of cardboard. Spray the thinner from about 1ft away. I would use a vertical pattern and pass the gun evenly from left to right. The desired result is a clean rectangle with no drips.
Check the PSI on the regulator gauge while spraying and adjust until the gauge shows a value between 20 - 25 PSI while running.
If you find that there is no fluid coming out check the needle is retracting fully. You may need to clean the needle even if it is brand new. Use a microfiber cloth to wipe it down and try again.
Choosing the best spray lacquer for wood
Now that your system is assembled, the next step is choosing the lacquer itself. The four families behave differently enough that this choice matters more than the gun:
| Family | Film | Color | Best use |
|---|---|---|---|
| Nitrocellulose | Softest of the four | Ambers with age | Walnut, mahogany, budget work |
| Pre-catalyzed | Hard, chemical-resistant | Slight amber | Furniture, tabletops — the default |
| CAB-acrylic | Hard | Water-clear, stays clear | Maple, dyed and whitewashed work |
| Waterborne | Good, slower flow-out | Clear | Indoor spraying, low odor |
Nitrocellulose is the classic — cheapest and easiest to spray. Pre-cat adds a catalyst for a harder film; check the date code, since shelf life is limited once catalyzed. CAB-acrylic is the one to use wherever ambering would ruin the color. Waterborne lacquer trades solvent fumes for easier cleanup. Andy Charron, who wrote the book on spray finishing, showed that waterborne lacquers spray to even, defect-free coats once you adjust for their slower flow-out (FWW, Jul/Aug 1997). Expect to raise the grain once before finishing.
For solvent choice and thinning across all of these, Jeff Jewitt's primer on thinning finishes (FWW, Sep/Oct 2001) remains the best single reference: the thinner must match the finish family, and with catalyzed products it must match the brand.
I recommend avoiding additives like driers, retarders, and sanding sealers — they contaminate the lacquer and degrade the finish. Skip satin and matte lacquer too: sanding standard gloss to satin gives a clearer, less muddy sheen than any flattening agent, and gloss carries fewer contaminants.
Lacquer top-tip
Much of the lacquer that can be found on the shelf is not of great quality. This is because of California laws that prohibit the use of certain ingredients which has affected the entirety of the market, not just in California where the law applies. Because of these restrictions, the product does not produce the best quality finish. However, there is a way around this that allows cabinet makers to have access to high-quality products without breaking the law. Cabinet maker supply stores sell lacquer and thinner in pairs. When mixed together, the two components react to create a high-quality lacquer without the individual products containing any of the restricted ingredients.
If you do decide to purchase your lacquer from a cabinet maker supply store it is essential you buy the matching lacquer thinner. Different brands use different combinations with a separate catalyst so a lacquer thinner from a different brand will not ‘activate’ your lacquer.
Mohawk and Gemini are two common brands that you are likely to find. Both of these are great quality, you just need to make sure that you purchase your lacquer thinner from the same brand and don’t mix and match!
The great thing about buying these kinds of lacquer is that you can buy them in bulk. They have a long shelf life and will last well if stored in the correct way. It’s a good way of keeping the overall cost down, especially in comparison to rattle cans.
Mixing the lacquer
Once you have the matching lacquer and thinner you need to create the right consistency for spraying in light coats. 1-2 inches of lacquer is usually more than enough to cover a 10-inch area. The amount of thinner you need will vary but usually around 10-20% of the amount of lacquer.
Before adding the lacquer to the cup on the spray gun it is important to stir it thoroughly, distributing any sediment that may have settled at the bottom. Pass the lacquer through a paint filter once mixed to remove any impurities. You can filter the lacquer directly into the cup and mix it with the thinner there. If you would prefer to make more accurate measurements you can mix the lacquer and thinner in a measuring cup and transfer. When you’ve done a fair bit of spraying, the amounts will get easier to feel out. Try to build up four or five light coats rather than two thick ones but don’t add so much thinner that each fresh coat will eat away at the one below. You do not need to filter the thinner.
If you have any leftover spray lacquer mixture do not add it back to the unmixed lacquer pot. Instead, add it to a clean glass jar to store. It may thicken over time but you can fix that by adding a little more thinner.
Safety
Setting-Up Your Workspace
Ventilation is of paramount importance when it comes to spraying. Make sure your workspace has a good cross flow of air and avoid spraying in poorly ventilated spaces. Perhaps even consider spraying lacquer outside where the overspray will just drift away in the breeze. You will also want to protect your workspace and cover your work surface. For example, if you are lacquering a turned piece while it is still on your lathe make sure to cover any pieces that you don’t want to get sprayed. You aren't going to get too much overspray if you are using a LVLP or HVLP sprayer, so you only need to worry about covering things close by. It helps to have plastic sheets and painter's tape to hand for this but make sure not to get anything stuck in the moving parts of your lathe.
PPE
If you want to spray lacquer you need to have a respirator, especially if you are doing it indoors. A standard dust mask is absolutely not going to cut it. If you can smell the fumes while spraying lacquer, you are inhaling it!
Look out for the NIOSH approval mark on your mask to make sure it lives up to its safety claims. You want a respirator with an activated carbon and a p100 filter so that you will be protected against organic vapors as well as particles like sawdust. Most masks will only protect against one or the other but there are options that protect against both - much more versatile!
If you have a VOC (volatile organic compound) respirator you should store it in a plastic bag to stop it from absorbing contaminants when it’s not in use.
Protective goggles or glasses are also a must to protect your eyes. You’ll also want gloves — they double as your drip-fixing tool, letting you smudge a run away with a fingertip. Overalls keep your clothes lacquer free.
You're ready to start spraying lacquer!
Everything is set up and tested. Time to spray.
Preparing your piece for spraying
Before you start applying lacquer you need to prepare your wood. You don’t want the wood to be ultra-smooth as the lacquer needs a rough-ish surface to stick to. It’s best to lightly sand your wood down to a 220-330 grit and stop there. The lacquer and finishing process will even out the surface as it is a film layer and sits on top of the wood rather than soaking in. However, if your wood has a porous end-grain you may want to consider giving it a coat of shellac so it won’t soak up the lacquer.
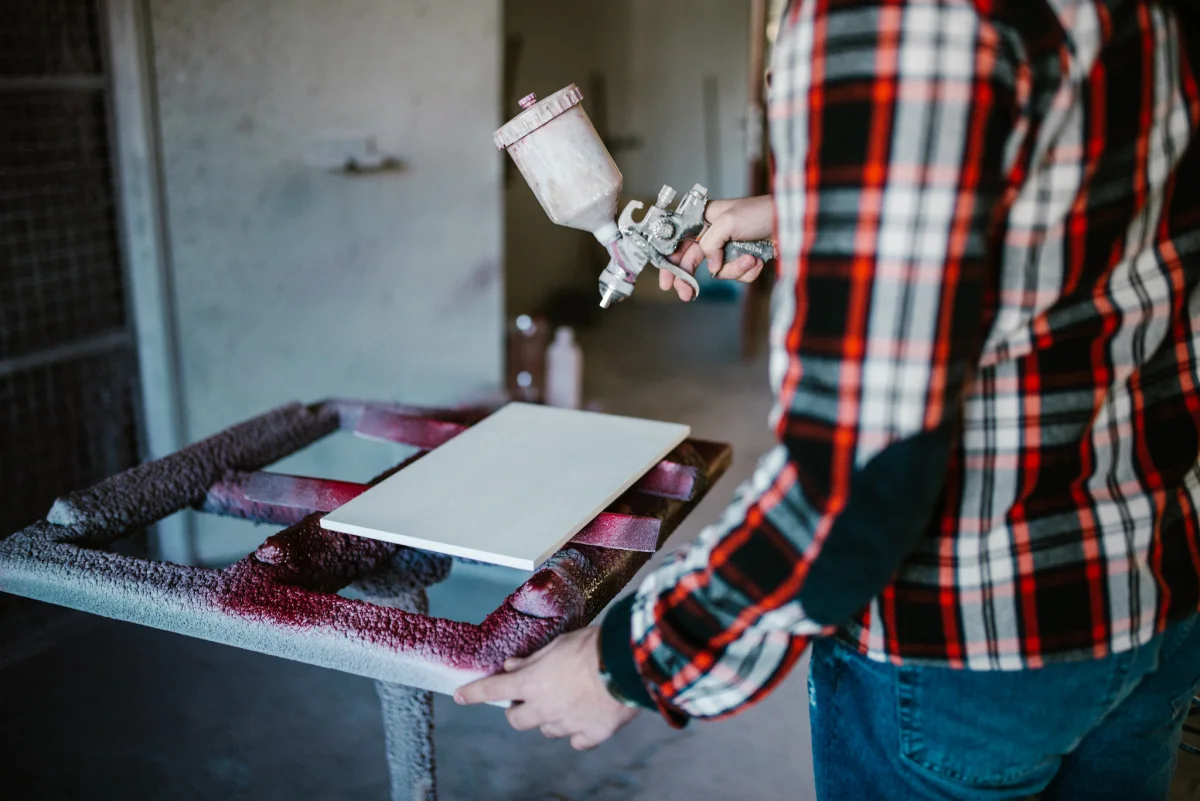
Spraying Techniques
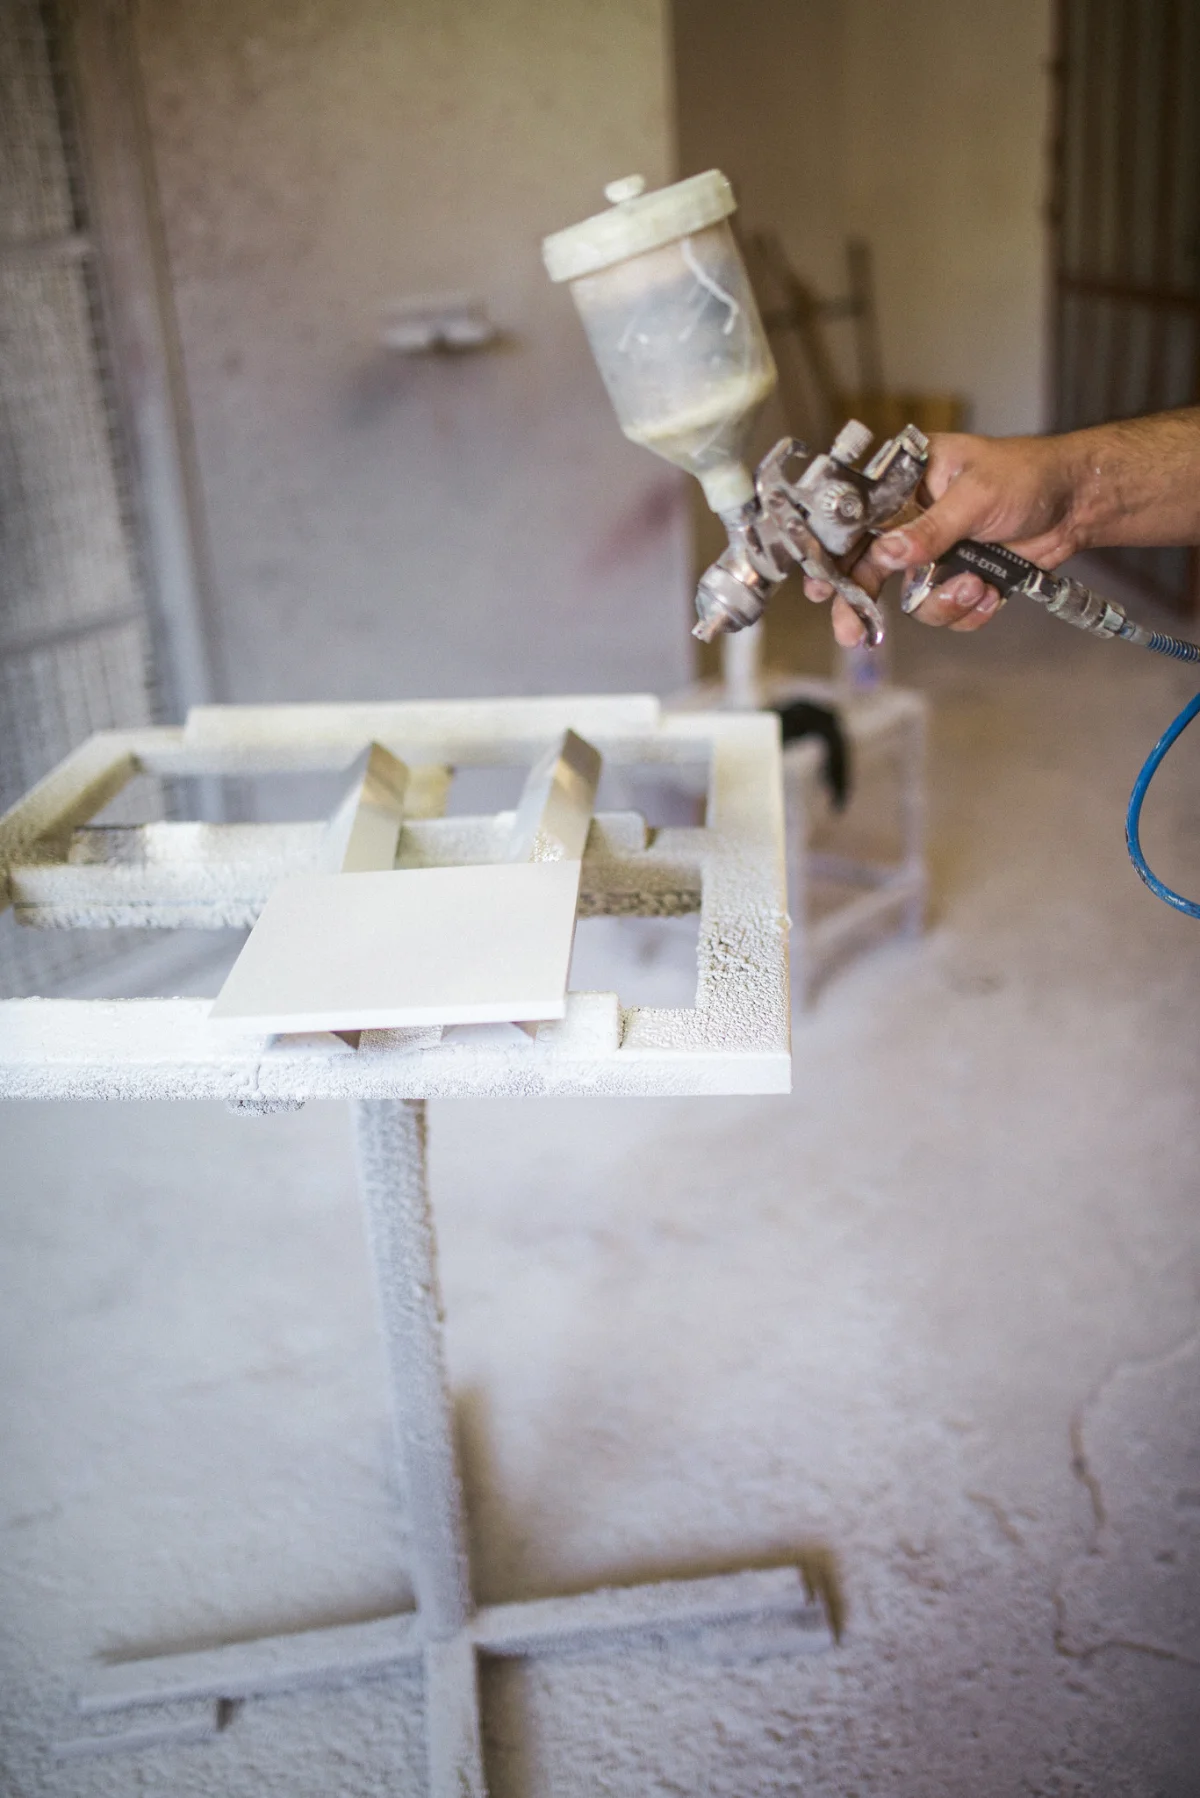
It’s time to get the spray gun out! Now that you have the lacquer mixed in the gun you want to be spraying from about 10-12 inches away from the wood. It can be a bit of a process of trial and error at the start until you get used to it. Do the first couple of sprays on your scrap cardboard again in order to test it out and make any adjustments to the air pressure and spraying distance.
If you are too close then the lacquer mix will run and if you are too far it will create a powdery layer.
Once you are happy with the spray you can move over to your piece and paint your first coat of lacquer. You don’t want to hang about and waste too much of your lacquer on a bit of card!
Maintaining a wet edge
Start off with the gun pointing slightly to one side of your piece. Press the trigger and steadily move the gun across the surface releasing it once you have cleared the other side. For large projects, you may not get all the way across with one spray but that’s okay. You don’t want to rush but don’t leave it too long before starting your next spray. You need to maintain a wet edge, so you can’t let the last spray dry before overlapping the next. Each spray should overlap by 50% to create a continuous appearance.
Layering it up
One of the great things about lacquer is that you don’t need to wait for the previous layer to fully dry. You only need to wait around 15 minutes between each coat of lacquer. The previous layer will still be tacky but it is perfectly fine to layer on top of this. After completing 3-4 more coats in the same manner you will want to wait a bit longer for it to completely dry - around 30 minutes.
You are going to need four to six coats but don’t be tempted to cut corners and use a thicker mix. Lots of thin layers will create a much more pleasing finish.
If you are spraying a turned piece it makes sense to keep it on the lathe. You can spray with one hand and slowly rotate the piece with your other hand. You can also turn the piece on the slowest speed between coats while it dries which helps the lacquer to settle on the surface and stops it from building up on one side.
Fixing drips
However careful you are it is likely that you will get a drip or two. Don’t worry. You won’t have to sand down your project and start again! Drips can easily be fixed. Simply use a gloved finger or a soft cloth to wipe the drip away. This will leave a smudge but that can easily be covered over. Lacquer is ‘self-wetting’ which means each coat effectively melds with the previous one. This makes making touch-ups incredibly easy. If your last coat is still wet you can just spray over the smudge and then carry on as normal. If the coat has already become tacky you need to spray another whole layer covering the whole piece. No one will ever be able to tell that you ever made a mistake!
Top Tip - If your final product becomes damaged you can just sand it down and apply a few additional coats, it will be as good as new!
Finishing
Once you have built up a good amount of layers and you are happy with the look of the piece it’s time to finish it off.
Sanding
Before the final coat you need to give your work a good sand. Before starting, make sure the lacquer is fully dry to the touch. Use a good quality higher grade sandpaper in the region of 500-600 grit or even 0000 steel wool and go over the entire piece working with the grain of the wood. This will get rid of any imperfections and leave you with a beautiful smooth finish.
The sandpaper may start to gum up from the lacquer but don’t throw it out. The dried lacquer can easily be brushed off and you can carry on using the same piece. It’s important to notice the build-up and brush it off as this lacquer layer stops the sandpaper from making contact with the surface of the wood.
Once you have finished sanding, wipe the piece down with a soft cloth. Don’t use a blower to clear away the dust. Any lacquer particles that are trapped in cracks or imperfections will re-wet when you spray on the final coat and give you an even smoother finish!
Final Coat
To finish it’s best to apply lacquer from slightly further away. Paint all over once with the grain and then again across the grain to get a smooth final finish. Then that’s it. You’ve finished spraying your first piece!
Curing
While spray lacquer may have a fast drying time, it can take over 24 hours to fully cure. The piece should be fully cured before bringing into the house or giving to a client as the lacquer will still be giving off harmful fumes. If you move a freshly lacquered piece of furniture inside you may find yourself with a headache. You should also wait at least 24 hours before putting together separate parts. For example, don’t slide in any drawers until your lacquer has fully cured or else they will become sealed shut.
Maintenance
To keep your spray guns in good working condition you should properly clean them after every use. Any leftover mix should be poured out and stored separately from the unmixed lacquer. Use a little bit of thinner and run this through the system to clear out any remaining lacquer.
Add more thinner to a separate glass jar. Unscrew the nozzle tip and leave this to soak in the thinner. If lacquer does dry in the nozzle you can also use this method to remove it.
Things to avoid
If spraying a turned piece, do not spray with the lathe running. This will create more overspray and leave a dull white film on your piece.
Don’t sand the lacquer until it is properly dry otherwise it will become streaky and smudged and you will have to add additional coats.
Don’t attempt to lacquer over silicone or wax as it won’t work. You can try sanding through the silicone down to the wood but you are still likely to run into problems.
Checklist
The full sequence, condensed:
Set-Up
- Use a compressor with the appropriate CFM for your tools.
- Assemble your system in the correct order: Air Compressor - Water Collector -Regulator - Hose - Sprayer
- Use Teflon tape on the thread of the connectors, applied in the same direction that you will tighten them and make sure everything is secure.
- Test the fluid flow through the sprayer using thinner with the hose detached.
- Add air and test on a scrap piece of card.
- Adjust the pressure until you can maintain a PSI between 20-25 while the sprayer is in use.
- Mix and filter your desired amount of lacquer.
- Add thinner (about 20% of the lacquer) and add to the cup.
Safety
- Prepare your workspace for spraying by ensuring good ventilation and covering exposed furniture and equipment.
- Wear a suitable respirator, eye protection and gloves.
Spraying
- Sand the surface of your wood to 220-330 grit
- Start by applying lacquer from 10 -12 inches away, testing the first few sprays on card and adjusting accordingly.
- Use a steady hand to paint a light coat pressing and releasing the trigger after passing the end of the surface being sprayed.
- Maintain a wet edge, covering the previous spray by 50% - remember it will dry quickly!
- Allow each wet coat to become tacky before spraying the next coat - about 15 minutes.
- After 3-4 layers allow to dry completely - drying times vary but it will be at least 30 minutes
Finishing
- When you have reached your desired coverage sand all over with 0000 steel wool or 500-600 grit sandpaper.
- Work with the grain and wipe off any gummed up lacquer that may build up on your sandpaper.
- Dust of your piece without blowing lacquer dust from the cracks.
- Apply lacquer all over from slightly further away, once with the grain and once across the grain.
- Leave to cure for at least 24 hours before assembling separate pieces.
Maintenance
- Remove leftover lacquer mix and store in a clean glass jar, separate from your unmixed lacquer.
- Run thinner through the gun to clean it out.
- Remove the nozzle tip and leave to soak in a little thinner.
And that's it! You're all set to start churning out beautiful lacquer sprayed pieces.
Frequently Asked Questions
Related
- Homemade woodturning finishes — oil, wax, and shellac alternatives for turned pieces
- Safety equipment for woodturning — respiratory protection for spray finishing
Written by Vince
Vince is a woodturner and the founder of WoodturningOnline. He writes tool reviews, buying guides, and turning tutorials to help woodturners at every level make informed decisions about their craft and equipment.