How to Install Bandsaw Tires
Your bandsaw is your primary tool for cutting turning blanks to size — from rounding off corners on bowl blanks to resawing boards for spindle stock. Bad tires are the number one cause of poor bandsaw performance. The tires on old machines are brittle or full of grooves caused by the tooth set of narrow blades, or they have deep cracks and missing chunks. Sometimes, tires have been replaced but haven't been properly trimmed and recrowned, resulting in a bandsaw that vibrates and won't track blades correctly. No matter how much attention is paid to alignment and adjustment, a machine with bad tires simply won't perform well.
The way to restore an older bandsaw's smooth and accurate performance is to replace the tires. Although each bandsaw is a little different (certain bandsaw wheels require factory-made tires that need special installation), fitting new tires usually can be done right in the shop by following the steps outlined in this article. The process includes removing the old tires, cleaning the rims, and then stretching the new tires on and gluing them in place. Then the new tires should be equalized, trimmed, and crowned, and finally, the wheels should be rebalanced.
Removing old tires and cleaning the rims
Getting off the old tires is sometimes easily done with two fingers. Other times, the cement tenaciously sticks to both the tire and the wheel. In either case, the process is simple enough, but a few extra steps can effectively reduce wheel cleanup later. In the toughest instances, insert a razor knife between the wheel and the tire and pour in a slight amount of lacquer thinner, which will partially dissolve the contact adhesive that holds the tire to the wheel. Wait about 30 seconds, and then pry with a screwdriver to enlarge the opening. After inserting a small wooden wedge, pour in a little more thinner, and wedge the tire farther off the wheel. Continue this process until the tire comes off entirely.
Next, all of the old contact cement has to be removed from the wheel; otherwise, it will cause lumps and gaps in the bonding of the new tire. First, remove the wheels from the saw, a process that's usually only slightly more complicated than taking a V-belt pulley off a motor shaft. Typically, this involves just removing a single nut on the end of each axle and pulling the wheel off (if you're in doubt, consult your saw's manual). Clamp one of the wheels in a vise with padded jaws. Working in a well-ventilated area, lay a strip of old sock on top of the wheel and pour on lacquer thinner. Let the soaked sock set for a couple of minutes, and the thinner will soften the old contact cement so it can be scraped off. After using this technique all around the perimeter of the wheel, go around it again with a solvent-coated, stiff-wire brush to remove any dry and crumbly cement. A wire wheel in an arbor or chucked in an electric drill works quickly on cast-iron wheels but can ruin the tire-bonding surface on aluminum or plastic wheels.
Stretching on new tires
Solid-band tires, which are most commonly found on woodshop bandsaws, cost about $1 per inch based on the diameter of the wheel (up to 38 in. dia). I purchase mine from the Pennsylvania Saw Co. Inc. (PO Box 533, Emigsville, Pa. 17318-0533; 800-233-9381). The tires on smaller bandsaws- 12 in. dia. or less- can be manhandled onto the wheel without much difficulty. Just C-clamp the tire to the wheel at one point, and work your way around the rim. However, installing new tires on bandsaws with 14 in. or larger wheels is like trying to stretch your lips around a bowling ball. To fit correctly, most new tires are about 15 percent to 20 percent shorter than the circumference of wheel they're made for.
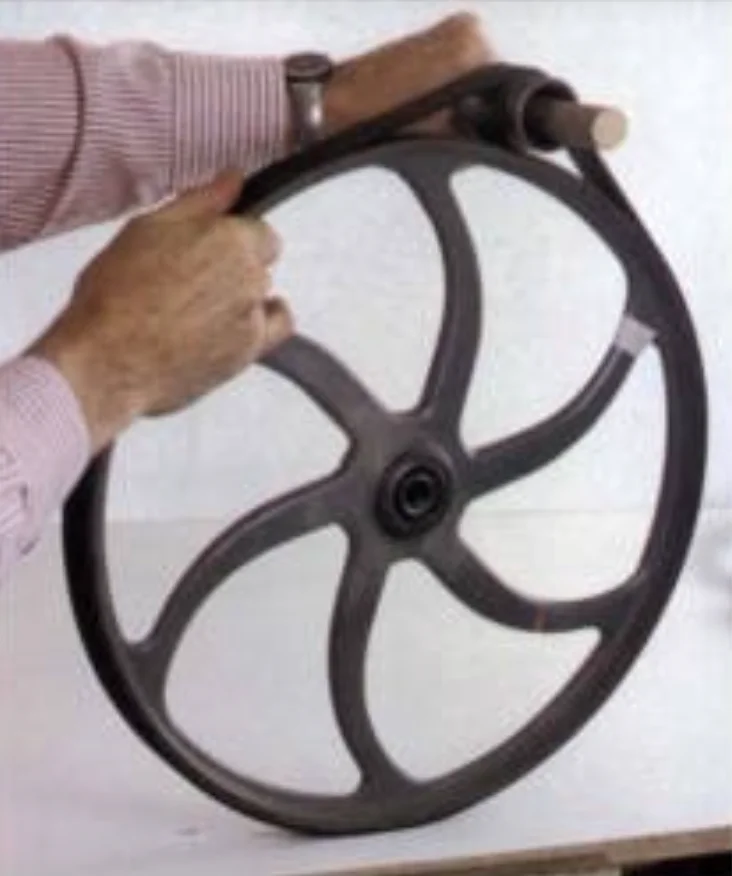
To install tires on large-spoked bandsaw wheels (the most common design) with relative ease, I've developed a method whereby the wheels themselves are used as a form for stretching the tires, so they can be slipped on. With both wheels removed and cleaned, as described above, lay them down on the bench, one on top of the other. Next, insert a ring-shaped spacer (I use an old ball bearing, but you could easily turn one from wood) between the wheel hubs so that the rims of the wheels are separated slightly more than the width of the new bandsaw tire. Now, sandwich the new tire loosely between the two wheels, and, as a temporary axle, insert a dowel or rod through the wheel hubs and spacer. Finally, put another spacer under the bottom wheel to raise the assembly about 1/2 in. or more off the bench.
 Equalizing the tension in the new tyre will prevent a bumpy performance later. This is done by rolling a short length of pipe around the wheel 3 or 4 times.
Before the stretching begins, you'll need to cut short, sturdy dowels (the same number as the number of spokes on one wheel). I use old broom handles and cut them about 2 in. longer than the total height of the wheel sandwich. You'll also need three 12-in. lengths of mason's twine or strong cord to tie the dowels in place during stretching. Cut a fourth length of twine about 24 in. long; thread it through the new tire, and tie the ends into a loop for use later to stretch the tire.
To begin the tire stretching, fish out a loop of the tire from between the wheels, insert a dowel down through the loop, and tie it to the wheel's rim (over one of the spokes) with a length of twine (see the photo on the facing page). Securing the dowel this way prevents it from rolling around the perimeter of the wheel each time the tire is stretched at a different spot. Repeat the stretching and dowel-insertion process about a third of the way around the wheel to form the second side of an equilateral triangle. For the third leg, pull on the string that's looped through the tire to help you stretch the tire so another dowel can be inserted (see the photo on the facing page). Repeat this pulling ceremony with the remaining dowels. I've found it unnecessary to tie the last few dowels to the rim because the first three dowels hold things pretty much in place. Once all the dowels are in place, you should be able to work the tire down over the bottom wheel without much trouble. Then, working carefully, one dowel at a time, remove the untied dowels first, and then cut the strings, and remove the tied dowels. Finally, turn the assembly upside down and repeat the procedure to mount a new tire on the other wheel.
Equalizing the tire and cementing it on
Once in place, the new tires need to be equalized to even up unequal thickness in the rubber that may have resulted from stretching. With a wheel on its edge on the bench, carefully lift the tire in one spot and insert a short piece of pipe (about 2 in. dia.) with a dowel slipped through the center (see the top photo). Now roll the pipe around the perimeter of the wheel at least three revolutions to equalize the tension of the rubber tire. Keep track of the revolutions by marking a starting point on one of the spokes with masking tape.
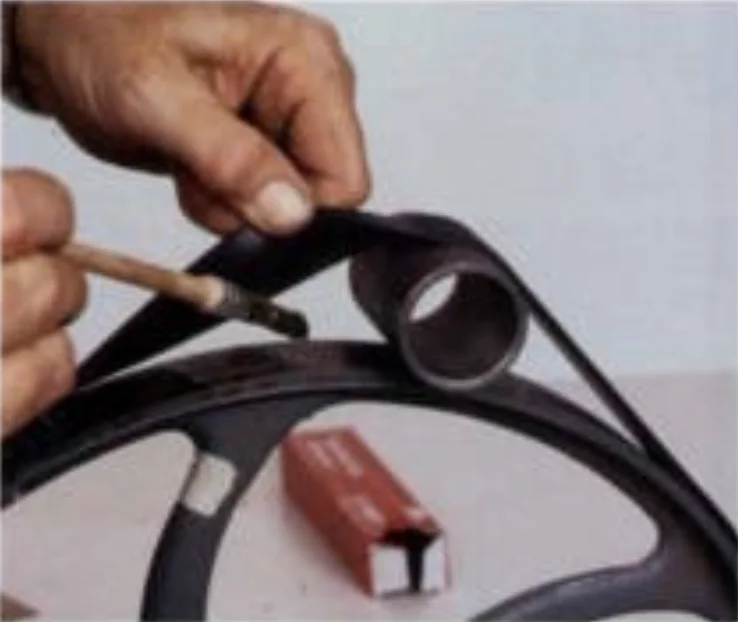 To cement a tire in place, lift the tire off the rim with a pipe, and apply weathership adhesive in one small area at a time, gradually working your way around the wheel.
For cementing the new tires on, I use 3M's weatherstrip adhesive because it's convenient to apply right out of the tube, and I find it much stronger than the other adhesives I've tried. Starting near your masking-tape mark, lift the tire with your fingers, and insert the short pipe you used to equalize tire tension. Brush cement on the exposed area of the wheel and the tire on one side of the pipe, as shown in the photo below. In the time it takes to apply the adhesive to both surfaces, the glue will get tacky, and the pipe can be rolled a short distance, so the cemented areas can bond (the tension of the tire should flatten any globs of cement that result from uneven application). Continue to apply the cement, working all the way around the wheel. When you get near where you started, there'll be a small area where you won't be able to apply cement, but don't worry about it; this small, unglued area won't be a problem. Now, let the glued tire dry for about 24 hours to be sure of a good bond.
Trimming and crowning
Next up are the most important steps of this job: trimming the tires concentrically and shaping a crown on them, which are necessary for good blade tracking. First, remount the wheels on the bandsaw, and tighten the axle nut firmly. Make sure there is no slop or looseness in either wheel on the saw; otherwise, the crowning will give lumpy and bumpy results.
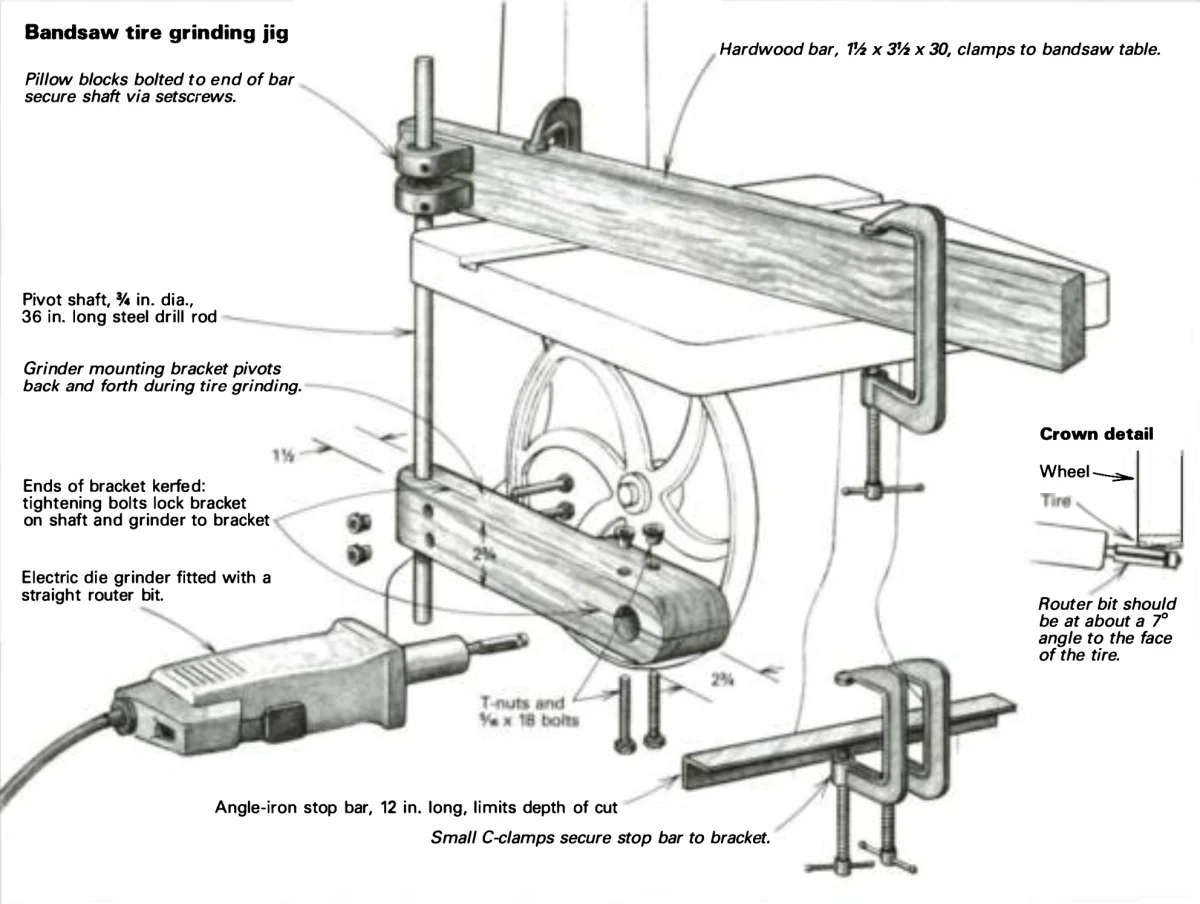
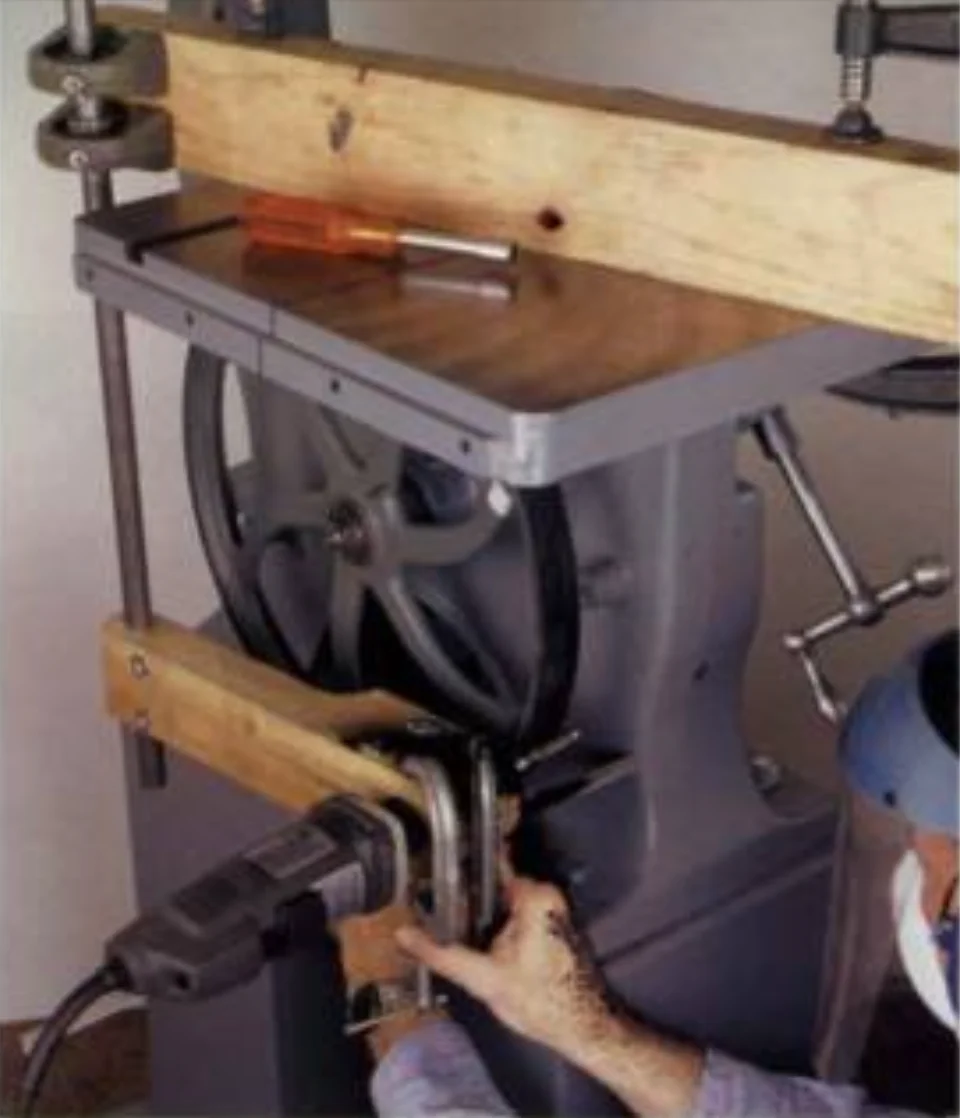
For trimming and crowning, I use a shopmade jig, shown in the drawing at the beginning. I've used this setup on bandsaws with 12 in. to 36 in. wheels. The jig, which is temporarily clamped to the saw, allows an electric die grinder fitted with a router bit to be pivoted into the tire. I use my Black & Decker die grinder because it runs at the same speed as a router, and it has a long, straight neck that's easy to mount. For a cutter, I use a 1/2-in.-dia. laminate trimmer bit with a ball-bearing pilot. I trim a V-shaped crown on all the bandsaw tires I install rather than the round crown typically seen on new tires. This V-angle is about 1°, which I find works well with any bandsaw blade but especially well on narrow ( 1/16-in. to 1/4-in.) blades. I can't imagine ever going back to the more-difficult-to-grind round crown.
To make the trimming jig, start by bolting a pair of pillow blocks to one end of a hardwood bar. The pillow blocks hold a 1/2-in.-dia. drill-rod pivot shaft, locked to the blocks with setscrews (locking collars are used on other styles). This allows the shaft to pivot but keeps it from sliding out. Bandsaw the grinder-mounting bracket to the shape shown in the drawing, and bore holes at each end-one for the shaft and one for the neck of the grinder. Kerfs sawn through these holes and bolts installed in T-nuts provide a means for locking the bracket to the shaft and the die grinder to the bracket. A length of stop rod, cut from flat or angle iron, completes the setup.
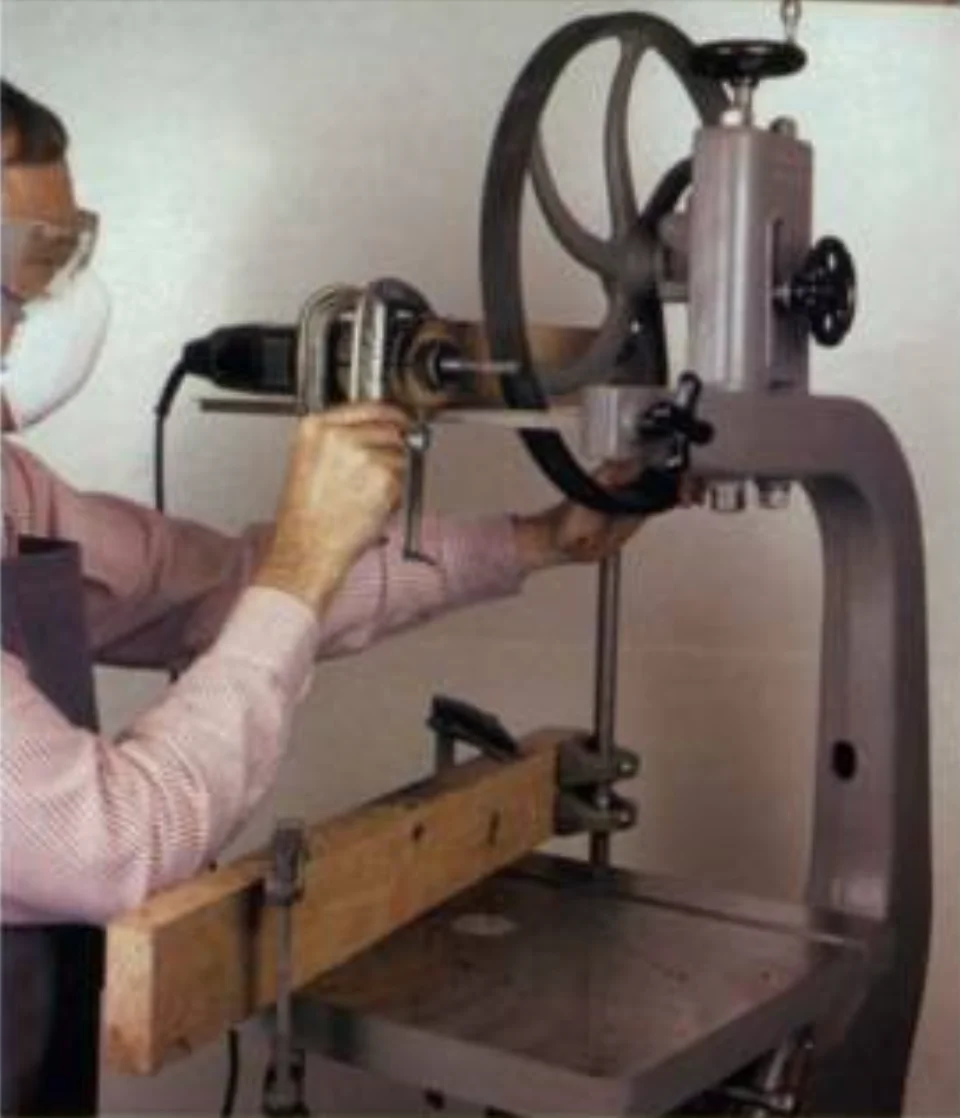
Before mounting the jig on the bandsaw, make darn sure that the power cord to both the die grinder and the saw are disconnected. Lightly clamp the hardwood bar to the saw table with the pivot shaft extending up for trimming the upper tire or down for the lower tire (see the photos on the facing page). Secure the die grinder in its bracket; then attach the bracket to the shaft with the T-nuts and bolts. Use a pair of small C-clamps to secure the stop rod to the bracket below the grinder. These C-clamps also make good operating handles for pivoting the bracket during trimming because they keep your hands away from the spinning bit.
Trimming each tire is done in stages: Three increasingly deeper passes cut one side of the V-shaped crown, and three cut the other. Trimming involves the somewhat tedious process of adjusting the jig parts to different positions, clamping and unclamping them to change the angle at which the bit contacts the tire and the depth of cut. It'll take time to get things right, especially on your first attempt, but the gratifying results outweigh the effort required.
You need to locate the axis of the jig's pivot shaft so that the axis of the bit relative to the surface of the tire is about -poff. For a saw with 1 1/4-in.-wide wheels, this angle will allow the bit to trim about 1/16 in. more at the edge of the wheel than at the center. Once you've set the correct angle, clamp the stop rod so that the first cut lightly trims the tire just at the edge. The stop rod is a crucial component of this rig. Without it, precision trimming is nearly impossible, not to mention dangerous.
Plug in the grinder (not the saw), and don a face shield and dust mask-this process sprays little black specks of rubber all over the place. Double check all clamps and setscrews (you need to be very sure that they are tight). Next, turn on the grinder, and then lock its switch on. Use one hand to turn the bandsaw wheel-very slowly - in the direction opposite the rotation of the bit at a perimeter speed of about 1 in. per second. With your other hand, slowly pivot the cutter into the tire. If the wheel isn't turning when the bit enters the rubber, a jolting kickback will occur, and the tire might be gouged. Until you get used to this setup, start with a very light cut to prevent this accidental gouging, which can ruin the tire.
It takes about three full revolutions of the wheel to trim one side of the crown smoothly. The first pass will have little dips where the bit went in and out when the wheel-turning hand changed positions; the second pass cleans up most of these dips. The third pass should be very slow and smooth to take a light shaving and clean up more of the little dips (resist the temptation to turn the wheel fast). Don't let any tiny dips that remain disturb you. They don't affect blade-tracking performance, and I can't completely avoid them either. When one side of the crown is finished, shift the pivot shaft's axis point to set the angle to trim the other crown, and repeat the process. I overlap the cuts slightly at the center of the tire, taking care that the apex of the tire crown is centered after the second cut. In theory, this should leave a point, but because the rubber is so soft, the crown is actually slightly rounded. After trimming both sides of the tire, flip the hardwood bar and pivot shaft over. Remount the grinder bracket on the shaft, and then trim the other wheel.
Rebalancing the wheel
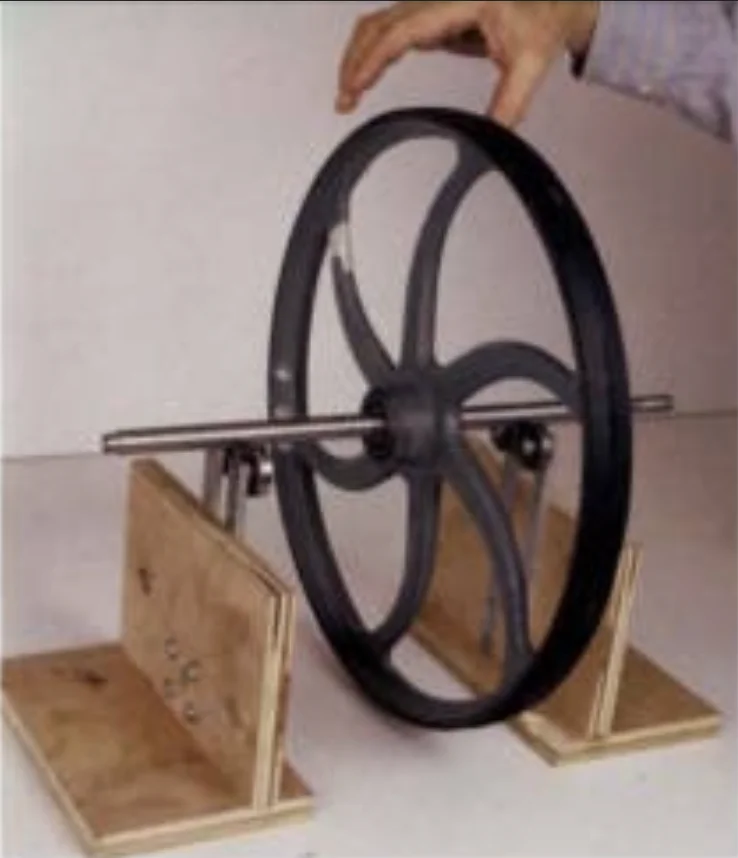 Rebalancing the wheel ensures vibration-free performance with the new tire. The wheel rides on pairs of ball bearings screwed to this simple jig. A heavy spot will consistently end up at the bottom, indicating where weight needs to be removed.
The new rubber tire can and usually does change the balance of the wheel. Therefore, you should remove each wheel from the saw after trimming to check the balance. My balancing rig shown in the top photo is crude compared to most static balancers, but the results are most satisfactory. I mounted pairs of ball bearings on the ends of upright steel strips and then screwed these strips to a couple of bookend-style plywood platforms. Although it surely would be quicker to balance the wheels on the machine, usually there is too much natural resistance from the bearing seals and lubricant for sensitive results.
To use the jig, insert a very smooth shaft, like a drill rod, through the wheel's hub, and then set it between the bearings, as shown in the top photo. The principle is simple - the heaviest part of the wheel rolls to the bottom. Experimenting with different wheel orientations will soon tell you exactly where the heaviest spot is. If the same spot repeatedly ends up at the bottom, take the wheel to the drill press and bore one or more shallow holes at the heavy spot on the inside rim of the wheel with a 1/2-in. twist bit. Conservative drilling is in order here. If you're afraid to drill into your wheel, then wrap and tape pieces of electrical solder around the spokes or screw on weights directly opposite the heavy spot. Recheck and drill/weight each wheel until it can be spun on the balancing jig without the same spot settling to the bottom each time.
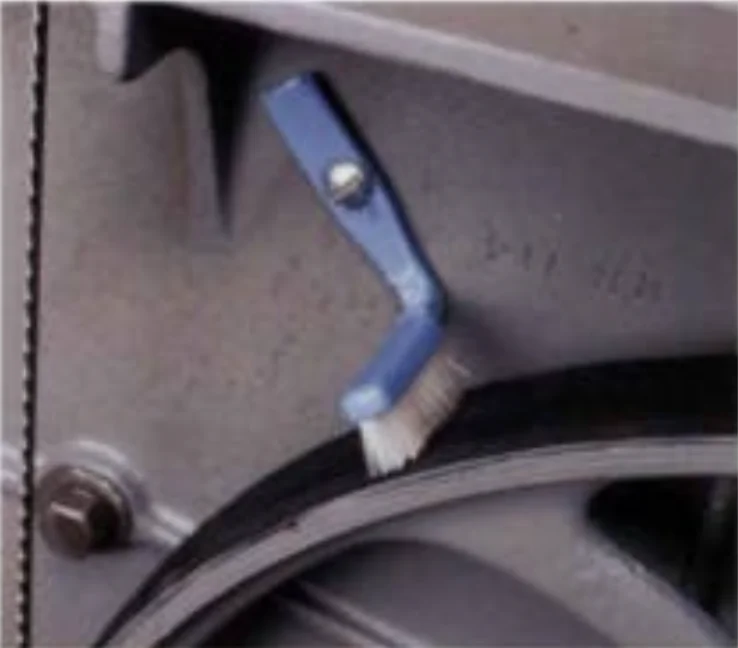 Keeping the wheel clean of sawdust and debris makes tires last longer. An old toothbrush bent and screwed into place serves that purpose.
Brushing after every wheel
After all of this work, it's a good idea to install a stiff brush on the lower wheel of your saw to clean and protect your new tires. A brush that contacts the lower wheel sweeps away dust, pitch, and other debris, which can build up and change the shape of the tire's crown and thus alter tracking. To make the brush, simply heat and bend a dogleg into the handle of an old toothbrush, as shown in the bottom photo, and screw it to the inside of the bottom wheel guard.
This guide comes to us courtesy of Bob Vaughn.
Written by Vince
Vince is a woodturner and the founder of WoodturningOnline. He writes tool reviews, buying guides, and turning tutorials to help woodturners at every level make informed decisions about their craft and equipment.