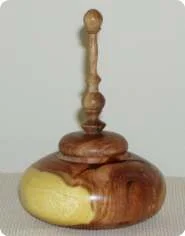
Project: Finial Box
This is a project we host by Don Jones.
Wood
Mesquite or what is available 6 inch X 6-inch log and a 1” X1” X 5” piece of similar or contrasting wood for the finial. All wood is +or - to fit what is available.
Tools
Three 4 jaw chucks or switch the parts around, two 3/8 gouges one sharpened to 45° the other to 35°, one-inch skew, a 3/8 heavy round scraper, a 3/8 heavy square scraper, ¼ heavy round scraper, roughing gouge, parting tool, dial indicator, six-inch rule, 100 to 600 grit sandpaper, live center, drill chuck and 3/8 Forstner bit. As with the wood what is available can be made to work. I use to make them with a lot less “stuff”.
Process
- I like to start with a limb of wet mesquite 4-6 inches in diameter and roughly 6 inches long which I’ve sawn as square as possible on each end for my little band saw. After marking the center at both ends and drilling a 1/8 inch hole in each end I mount it between centers.
- Next, I turn the bark off bringing the piece to a cylinder with the roughing gouge and clean up each end with the skew. The skew is used to turn two 3/8 inch tenons on each end before parting the piece in the middle.
- Select the piece that will be the bottom of the box and secure it in a four jaw chuck. There is now a piece 2 ½ inches long extending from the chuck which needs to be trued up on the end and the side with a 3/8 gouge.
- Now the corners are turned off hopefully making a pleasant shape again with the 3/8 gouge.
- Now the 3/8 forty-five-degree gouge is used to hollow the bulk of the material from the inside of the box.
- The gouge is used to drill down the center to near the bottom then working from the bottom out remove as much material as possible before chatter sets in. I gradually widen the opening until it is about an inch.
- The 3/8 heavy scraper is used to finish hollowing the bottom of the box. I sand the outside of the box after turning a bead around the opening. Hopefully, the scraper has left a bearable surface on the inside for it is too much trouble to sand.
- Important: the last thing I do to the bottom half of the box is true the opening. This is done with the 3/8 heavy square scraper. The sides of the opening need to be parallel with the ways of the machine to ensure a good fit for the top. Remember the smaller the opening the more difficult it for prying fingers to examine the finish on the inside.
- I leave the bottom half in the chuck which I remove and replace with another. The top is now secured in the chuck. There is a lot of wasted to be removed from the top. A parting tool is used to set a boundary about 5/8 of an inch from the chuck. This material is used later to make a jam chuck to hold the bottom half to finish the foot.
- The lid will be about a 1/2 inch or so larger than the opening so I turn away the waste. This is a good time to be patient and take your time. Now the end is turned down to fit in the opening in the bottom half of the box. I measure the opening with dial calipers and remove waste until I am close to the opening size. Patience, you can cut more off but you can’t put it back on. I want a jam fit. Now I go back to where I made the boundary mark and finish parting of the roughed lid. The piece of wood that is left stays in the chuck which is removed and replaced with the chuck holding the bottom half. The lid is now fitted in the opening of the bottom half and can be turned down and sanded. It should extend about ¾ of an inch above the opening. Now the drill chuck and 3/8 Forstner bit are used to drill a 3/8 deep X 3/8 hole in the top for the finial.
- A third chuck is used along with a live center to hold the one-inch square piece for the finial. Finials are not that hard if you take your time and use sharp tools. Oh yes, and practice cutting the basic shapes. I rough the piece to a tapered cylinder with the roughing gouge. I have no picture; just what is in my mind that I hope will complement the rest of the turning. I turn whatever beads, grooves, or coves as I go, and if I’m not happy I’ll try another piece. A 3/8 foot is turned at the base to fit in the hole in the top. I part the piece I hope to use off with the skew.
- The chuck is removed and replaced with the first holding the bottom half and the top or lid. The finial is glued to the top being held in place by a live center made to hold the point of the finial. After the super glue dries any reshaping onsanding of the whole piece can be carefully done.
- The lid with the attached finial is removed from the base and the opening is carefully sanded to give a satisfactory fit. All the while I’m telling myself “take your time or you’ll scrap another one.”
- The base is removed from the chuck which is replaced by the chuck with the 5/8 piece of scrap. A jam chuck is made which will hold the bottom for finishing the foot. A live center is used to ensure everything staying in place while the foot is turned and sanded. A small piece is left in the center which I will part off with a skew.
- Two or three coats of Danish Oil are applied to the inside and outside then 3 days or so later it is buffed with a Beal Buffing system. So far most pieces have lost a little weight every day until the moisture is gone. No cracks and no warping! If the log is big enough the finial can be made in one piece with the top. It is good practice at removing waste wood taking a 6-inch branch down to a ¼ inch.
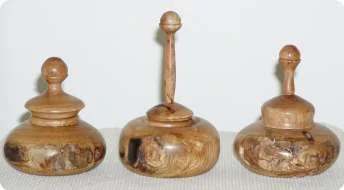 Three ring holder boxes each turned from one piece of dry mesquite making the finial and top in one piece.
Related
- Project: Snap lid box — another box-turning technique with a friction-fit lid
- Best woodturning tools — gouges, scrapers, and parting tools for box turning
- Lathe chuck types — four-jaw chucks for box work
- Sharpening woodturning tools — keeping your skew and gouge sharp
Written by Vince
Vince is a woodturner and the founder of WoodturningOnline. He writes tool reviews, buying guides, and turning tutorials to help woodturners at every level make informed decisions about their craft and equipment.