Project: Turning a Toy Soldier Ornament
This is a project by Bob Baucom that we are proud to host. We hope you enjoy it!
Introduction
Small figure ornaments and woodturning toys (like spinning tops) are always fun to turn and paint. Turners have developed a variety of toy soldier designs over the years. Always looking for different ornaments to turn for children for the holidays the following ideas looked like they would be interesting and fun. The toy soldier ornament is made of beads and coves, both of which can be done with a skew or a spindle gouge without additional wood turning tools. Toy soldier ornaments can be any size.
Design Consideration
Since this is an ornament it needs to be lightweight. The shape and size would depend on the size of scrap wood. Each ornament can differ by following a published design or creating your own. In this project, I am going to use Dusty Penta’s (a friend of mine) design. Included in this handout is a design Alan Leland uses that is in the Nick Cook style.
Turning the Toy Soldier
- First, place the blank 1“ X 1“ X 6“ blank between centers and turn it to a cylinder.
- Then turn a 3/4” diameter by 3/4” long tenon on one end for chucking.
- Now mount the blank into a chuck. I bring up the tail stock of the lathe for safety.
- Take a ruler and measure from the tailstock end of the blank 2 1/2“ and mark the blank with a pencil. Now measure and mark where 1/4“ , 1/2“ , 1 1/2“ , 2 1/2 “and 3“are from the tailstock. Taking a skew make “V” cuts at the 1/4“, 1/2“, 1 1/2 “, 2 1/2“ and 3“ (figure 1).
- With a spindle gouge, turn a 1/4“ high by 1/2“ diameter bead between the two “V” cuts nearest the tailstock. This will be the soldier’s shoes. The extra 1/4“ of wood with the hole in it from the live center is going to be parted off.
- Next turn a tapered cove to represent the soldier’s pants (figure 2). This can be done using the same 3/8“ spindle gouge. The wide part of the cove toward the head stock should be 3/4“ and the opposite end 5/8“ in diameter.
- Now turn a long half bead that is 1“long for the soldier’s coat. Start at the top of the pants leaving this end of the half bead 1” in diameter and gradually taper toward the “V” cut at the 2 1/2“ mark.
- To turn the soldier’s head turn a bead 3/4“ in diameter by 1/2“ high or long. Use the 2 1/2“and 3” “V” cuts to establish the height of the bead.
- Just above the bead for the head turn a 1/8“ wide bead 7/8“ in diameter for brim for the soldier’s hat.
- Now turn a 1“ long taper form the 1/8“ hat brim bead toward the head stock. The top of this taper can be flat, cone shaped or rounded for the top of the hat (figure 3).
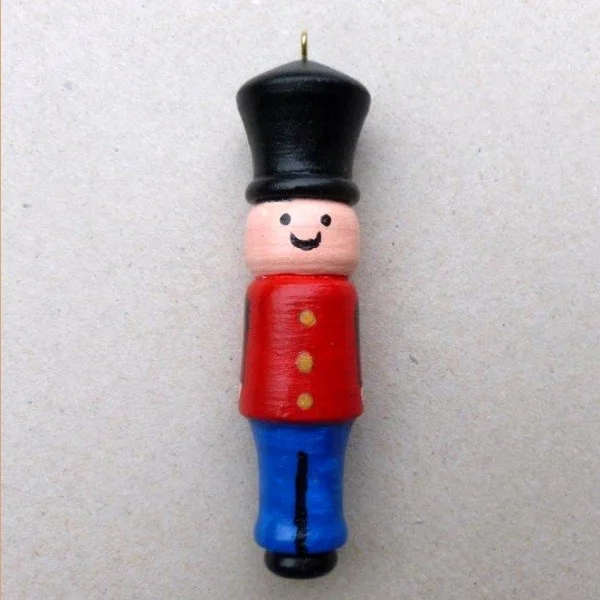
- Sand the toy soldier and part it off. The toy soldier ornament is now ready to paint (figure 4).
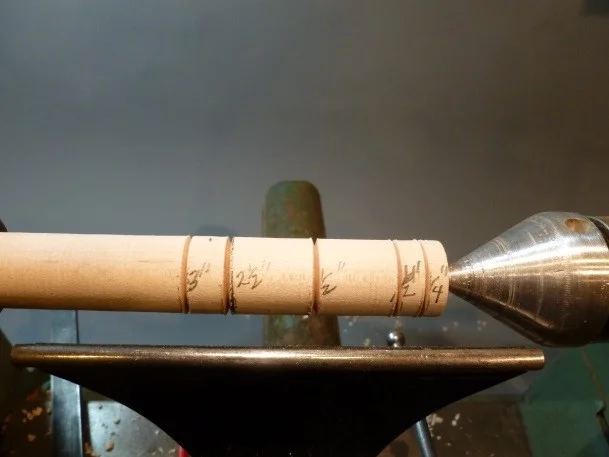 Turning a Toy Soldier: Figure 1
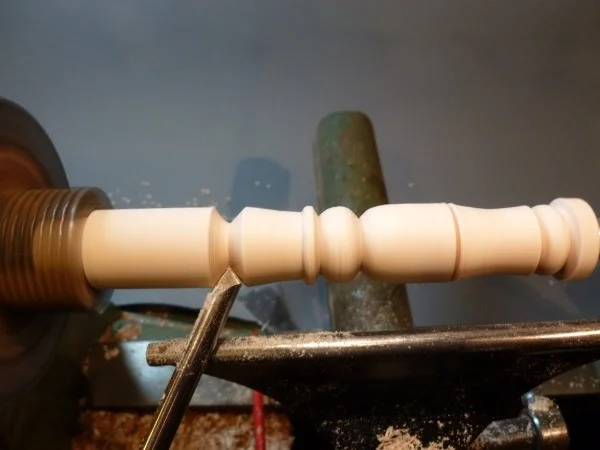 Turning a Toy Soldier: Figure 3
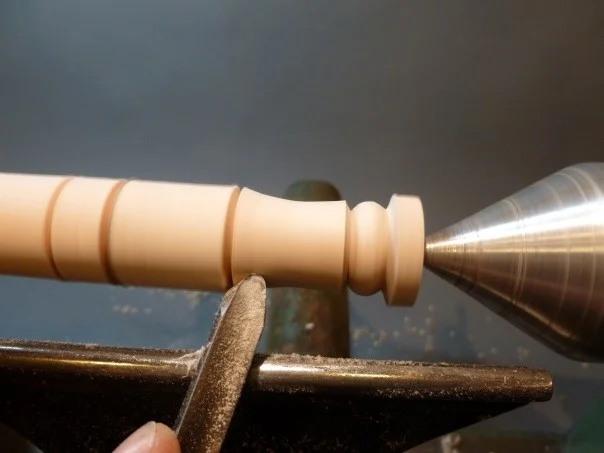 Turning a Toy Soldier: Figure 2
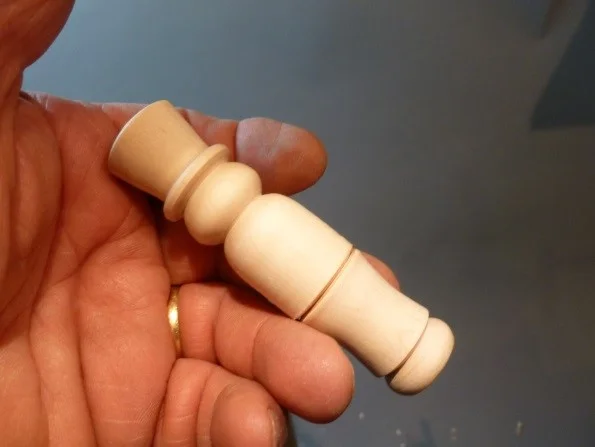 Turning a Toy Soldier: Figure 4
Design

Another Design Option

Materials Needed for a Toy Soldier Ornament
- 1-1” X 1” X 6“ piece of hard wood
Tools Needed for Turning
- Roughing gouge
- 3/8” or 1/2” spindle gouge
- Parting tool
- 1/2” Round skew
- Skew or 3/8” beading parting tool
- Chuck with #2 jaws
- Sandpaper up to 320 grit
- Calipers
Things Needed for Decorating
- Pencil
- Small water base Paintbrushes
- White gesso
- Acrylic paints
- Clear Gloss acrylic finish (Minwax Polycrylic or another brand)
Related
- A beginner's guide to using a wood lathe — lathe basics for spindle projects
- Best woodturning tools — gouges, skews, and parting tools for ornament turning
Written by Vince
Vince is a woodturner and the founder of WoodturningOnline. He writes tool reviews, buying guides, and turning tutorials to help woodturners at every level make informed decisions about their craft and equipment.